收录经过整合和验证的Hexo-Next配置方案,主要内容来自于网络技术文章,并给出出处,感谢网络大佬们的分享~
修改超链接颜色
- Hexo Next 修改超链接颜色
- Hexo
Next博客优化
在./themes/next/source/css/_custom/custom.styl里添加如下代码
a:not(.btn)避免修改首页的”阅读全文”按钮的样式
1
2
3
4
5
6
7
8
.post-body a:not(.btn){
color: #0593d3;
border-bottom: none;
&:hover {
color: #0477ab;
text-decoration: underline;
}
}
嵌入pdf文件
- 在source目录下新建
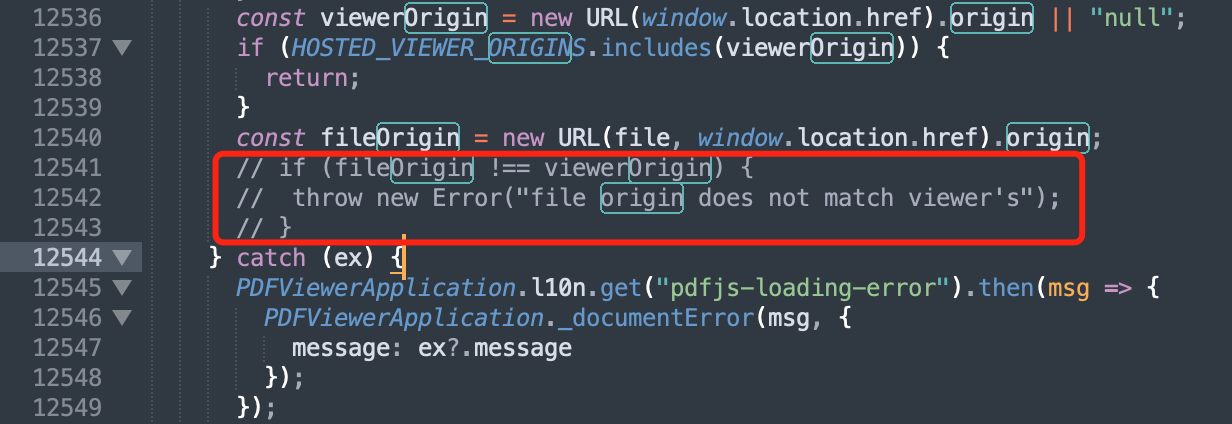
scripts目录,下载pdfjs放入其中 - 修改pdfjs中的
web/viewer.mjs文件
- 修改配置文件
_config.yml, 将scripts目录添加到跳过渲染配置1
skip_render: [scripts/**]
- 将pdf文件放到
source目录下,比如source/pdfs - 添加pdf文件到md文件 > Note pdf文件路径应改为
1
<iframe src="/scripts/pdfjs-4.10.38/web/viewer.html?file=/pdfs/example.pdf" style='width:100%;height:800px'></iframe>
/pdfs/*.pdf
示例如下,来源The-Art-of-Linear-Algebra.pdf:
Hexo Tag Plugin实用技巧
引用
1
2
3
{% blockquote [author[, source]] [link] [source_link_title] %}
content
{% endblockquote %}文章引用
Note filename不包含日期和扩展名,比如1
{% post_link filename [title] [escape] %}
{% post_link 测试 %}图片
Note1
{% img text url [external] [title] %}
url应为/images/*.*,比如{% img class /images/2025-02-17-Render-line-001.png 400 400 title alt %}嵌入代码文件
Note 配置1
{% include_code [title] [lang:language] [from:line] [to:line] path/to/file %}
_config.yml下的code_dir字段,path/to/file是code_dir下的路径,比如{% img class /images/2025-02-17-Render-line-001.png 400 400 title alt %}
图片对比
As this tag plugin relies on an external JS library, the files image-compare-viewer.js and image-compare-viewer.css (or its minified versions) must be loaded in the header of the web page.
Syntax:
2
3
4
5
6
"imgFileOriginal"
"imgFileModified"
"descriptionModified"
[orientation=vertical]
%}
一开始确实不知道怎么配置,给出的说明也没有详尽到怎么操作。主要参考上面给出的两句话must be loaded in the header of the web page和作者给出来的示例生成的html,再就是搜索image-compare-viewer在项目中出现的位置,不断试错,推断配置的方法。未必是前端使用的标准方法,不过目前能用。
tag-image-compare.js放到themes\next\scripts\tags目录,可以看到其他tag plugin也在这个路径下image-compare-viewer.min.js和image-compare-viewer.min.css放到themes\next\source\js目录,作者应该是通过打包时候的什么方法拷贝到目标目录,前端不熟没找到方法- 在
themes\next\layout\_partials\head\head.swig中添加如下代码,把image-compare-viewer引入到网页头部1
2<link rel="stylesheet" href="{{ url_for(theme.js) }}/image-compare-viewer.min.css">
<script src="{{ url_for(theme.js) }}/image-compare-viewer.min.js"></script> - 看了一下
tag-image-compare.js的代码,居然很简单,修改一下语法修改之后的语法:tag-image-compare.jsview raw 1
2
3
4
5
6
7
8
9
10
11
12
13
14
15
16
17
18
19
20
21
22
23
24
25
26
27
28
29
30
31
32
33
34
35
36
37
38
39
40
41
42
43
44
45
46
47
48
49
50/*
Image Compare Viewer: https://image-compare-viewer.netlify.app/
Syntax:
{% image_compare
  "imgFileOriginal"
  "imgFileModified"
  "descriptionModified"
  [orientation=vertical]
%}
*/
hexo.extend.tag.register('image_compare', function (args) {
const [
original,
modified,
descriptionBefore,
descriptionAfter,
orientation
] = args;
var assetPath = this.path;
var verticalMode = (orientation === "vertical").toString();
var id = "image-compare-" + Math.random().toString(36).substring(2,8);
var elements = `
<div id="${id}">
<img class="image-compare image-original" src="${original}" alt="" />
<img class="image-compare image-modified" src="${modified}" alt="" />
</div>
<script>
var themeColor = "#ffffff";
if (localStorage.getItem("theme") === 'dark') {
themeColor = "#222222"
}
new ImageCompare(document.getElementById("${id}"),
{
controlColor: themeColor,
controlShadow: false,
verticalMode: ${verticalMode},
showLabels: true,
labelOptions: {
before: '${descriptionBefore}',
after: '${descriptionAfter}',
onHover: true,
}
}).mount();
</script>
`;
return elements;
});1
2
3
4
5
6
7{% image_compare
"imgFileOriginal"
"imgFileModified"
"descriptionBefore",
"descriptionAfter",
[orientation=vertical]
%}
示例一个:

